How to Stop Annoying Notifications in Web Browsers

If you spend a lot of time browsing the Web, then you may have noticed that there is a large number of random Web pages, which insist on convincing you to click 'Allow' on the pop-ups they show. But what is their goal? According to the pop-ups of these pages, users must click 'Allow' in order to:
- Play a video.
- Pass an anti-robot or CAPTCHA check.
- Unlock additional content.
- Proceed to the next page.
However, if you have tried following the instructions of these websites, you may have noticed that nothing obvious happens when you click 'Allow.' So, what is the purpose of this whole thing? Well, the answer is pretty simple – the 'Allow' button in your browser is asking you to enable the particular website's notifications. If you approve this change, you will automatically subscribe to the notifications of the website in question.
Table of Contents
Why Should You Disable Unknown Notifications?
While this is not a malicious change, it may hinder your Web browsing experience greatly. These sites want to hijack your browser notifications, so that they can abuse the feature to spam you with intrusive ads, pop-ups, and alerts. Their notifications are dedicated to spreading sponsored content, and they may also link to online scams, fake offers, and other suspicious content.
So, what do users need to do if their Web browser suddenly starts showing notifications from a random website they are not familiar with? Resolving this problem is surprisingly easy – you need to block the intrusive website's ability to use browser notifications. If you are not sure how you can do this, then you will find a helpful step-by-step guide below. In our example, we will use one of these shady websites as an example - Chicheet.com.
Removing Unwanted Notifications on Google Chrome
- Open the Chrome menu button by clicking on the three dots in the upper-right corner.
- Select Privacy and Security on the left.
- Click on Site Settings.
- Select Notifications from the Permissions field.
- Scroll to the bottom to see the websites allowed to show notifications.
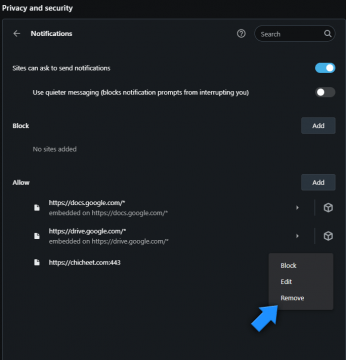
- Click the 'three dots' icon shown next to the shady website's name and select Remove.
- Done! You have removed the intrusive website's permission to show notifications, and they will not show up again.
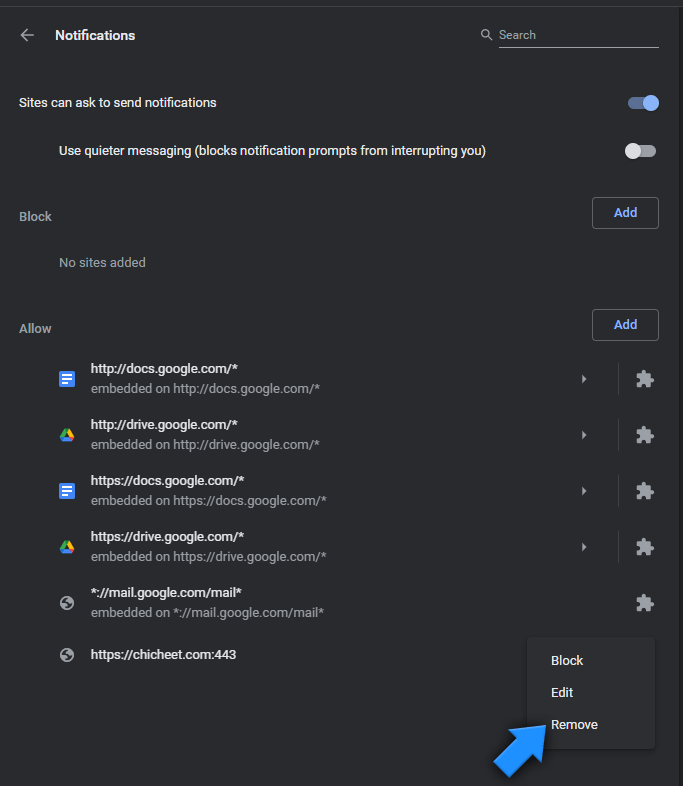
As you can see in the screenshot, Google Chrome is allowing permissions for legitimate, Google.com domains. However, also the unknown/shady Chicheet.com is given permission to use notifications. Thankfully, a few clicks are all you need to block the intrusive site's content.
Removing Unwanted Notifications on Microsoft Edge
- Open the menu in the top-right corner of Microsoft Edge by clicking the icon represented by three horizontal dots.
- Go to Settings.
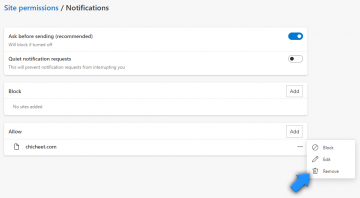
- Open Cookies and site permissions.
- Select Notifications from the list.
- Check the Allow section for the name of the website spamming you with notifications, then click the three dots next to it, and select Remove.
Removing Unwanted Notifications on Mozilla Firefox
- Access the Firefox menu by clicking on the three horizontal lines in the top-right corner and selecting Options.
- Select Privacy & Security.
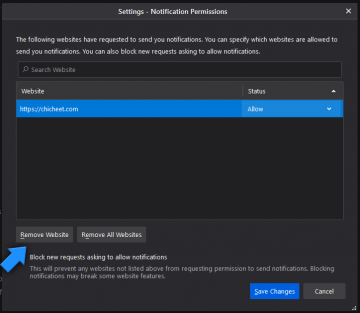
- Scroll down until you see the Permissions section and click on Settings next to Notifications.
- You will see a list of websites allowed to use notifications. Find the website causing problems, select it, and press Remove Website.
- Save the changes you just made, and enjoy a browsing experience free of intrusive notifications.
Removing Unwanted Notifications on Opera
- Access the Opera menu by clicking on the three horizontal icons in the upper right corner.
- Click on Go to full browser settings found at the bottom of the menu.
- Select the Site Settings section.
- Select Notifications.
- In the Allow section, you will see all websites whose notifications you are subscribed to. Remove unknown and unwanted entries by clicking on the three dots next to their name and selecting Remove.
Removing Unwanted Notifications on Safari
- Click the Safari button in the upper left corner, and choose Preferences.
- Open the Websites section, and select Notifications on the left.
- You will see a list of pages allowed to use notifications. Mark unknown/intrusive websites, and then click Remove on the bottom to stop their notifications.
Some websites known to try and hijack browser notifications are already covered on our website – Remove Vacancyth.biz Notifications and Pop-Ups, Remove Rdsstilrang.club Notifications and Pop-Ups, Remove Besty-deals.com Notifications and Pop-Ups, Remove Admntrk.com Notifications and Pop-Ups, and others.


