Setting Up Windows Backup in 7 Easy Steps
Using Windows 10's File History is a convenient method to ensure that files critical to a user's work are not lost, misplaced or damaged beyond repair.
The File History feature was first made available with Windows 8.0, and if used can add another safety net for your crucial files - it automatically saves file folders of your choosing to backup devices, which in turn allows you to effortlessly recover a prior version of a file should the need arise, for whatever reason. Here's a handy guide on how you can do that.
Setting Up Windows Backup
- Prepare a functioning external device for the archive to be put on - this could be a USB stick, a full-fledged external hard drive or a network location on a NAS (Network Attached Storage) drive.
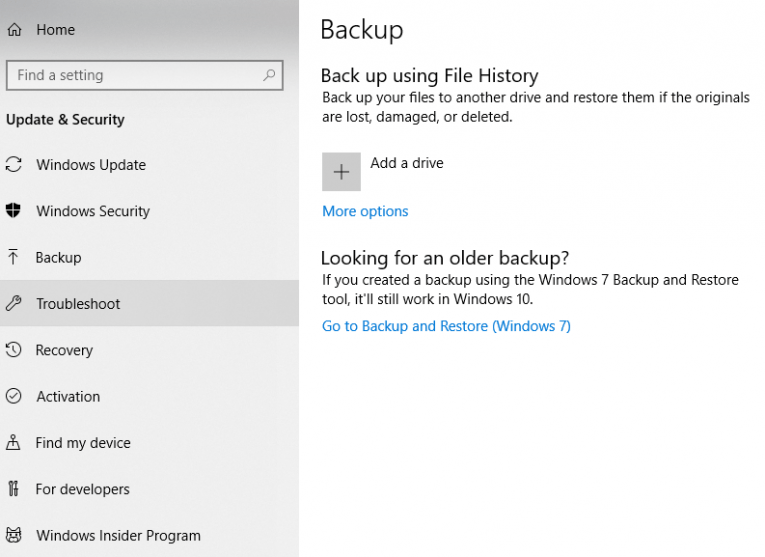
- While in Windows 10, select the "Start" button then click on "Settings". Once you have entered the Settings window, select "Update & security" and then the setting for Backup. Look for the section named "Back up using File History," on the right side of the window, then select "Add a drive."
- Windows will now display a list of all locations on which a backup can be made. Select the location you wish to use for your backups. With this done, you have successfully enabled "File History", though it's not yet backing up any of your files.
- Select "More options." Scroll down all the way do the Backup options window. There, you can see a list of default folders already included in the backup. While there, you can choose any folder you don't wish to be back up automatically and then click the "Remove" button.
- Once you have chosen which files you wish to backup, go back up to the very top of the window and select Add a folder. A File Explorer will then open, allowing you to select any folders not yet included in the backup, that you wish to add in addition to the ones already selected.
- At the very top of the "File History" section, select "Back up my files". This is the place where you can select how frequently you wish to back up your files, with options ranging from "Every 10 minutes" to "Daily" and more. Once you've chosen that, select drop-down menu for "Keep my backups" and choose how long you want to your backed up files to be kept – choose any option you like, such as "Forever" or "Until space is needed".
- After you make all of these selections, choose "Back up now." Doing this will cause Windows to start backing up the files you included in your backup list, in the way you specified. After the process is complete, Windows will display the total size and the date and time of the backup – note that this may take a while.
Recovering Files Via Windows Backup
- Go to "File History" and find and select the section that says "Restore files from a current backup". Windows will then display all of the folders that have been backed up through the use of the "File History" feature. You will probably have to scroll a bit to find the file you wish to recover, but rest assured – if you have followed the steps given above correctly, it should be there.
- When you find the page that you think could contain the file you are looking for, double-click on its folder. If you see the file you seek, you can double-click on it to review it. If it's the file you need, select the green button with the white arrow at the bottom of the menu to restore the file.
- If the original file is gone, Windows automatically restores it to its previous location. If a file with the same name still exists in the original location you wish to restore the file to, Windows will prompt you to replace it, skip it, or compare both files. Choose whichever option best suits your needs.
July 23, 2018


